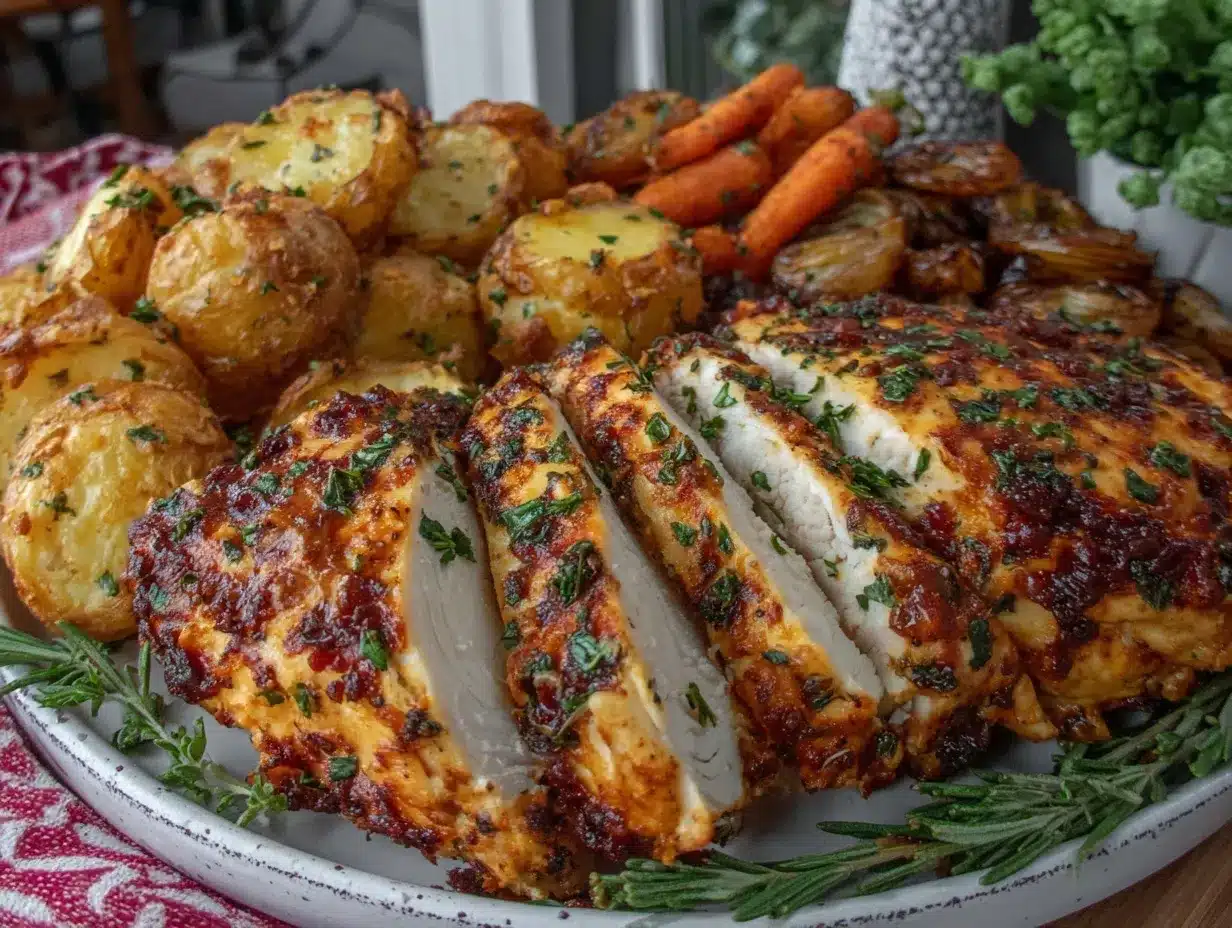
“Hold up, did you just cook that chicken in one pan and it came out that crispy?” That’s the exact line my friend blurted out last week when I whipped up this crispy boneless chicken breast recipe in under 20 minutes flat. Honestly, I was half-expecting it to be another one of those “quick dinners” that fall flat. But nope, it was golden, crunchy, and juicy all at once. The whole thing started on a hectic evening when I was juggling work emails, a cranky toddler, and no inclination to dirty more than one pan. I was skeptical at first, thinking I’d have to do some fancy prep or wait ages for the chicken to cook through. But with a simple seasoning mix and a hot skillet, this one-pan wonder turned into a real lifesaver.
What surprised me most was that the chicken stayed moist inside with that perfect crust on the outside — you know the kind that makes you pause mid-bite? It quickly became my go-to when I needed dinner fast but didn’t want to sacrifice flavor or texture. There’s something quietly satisfying about having a recipe that feels both effortless and impressive. Plus, I love that it doesn’t pile on complicated ingredients or steps. It’s just good, honest cooking that works on busy nights or when guests drop by unannounced.
After making it several times last week (yes, I was obsessed), I realized this recipe isn’t just a quick fix — it’s a reminder that simple ingredients and one pan can produce something truly crave-worthy. If you’ve ever found yourself staring into the fridge, wondering what to do with chicken breasts without turning on every burner in your kitchen, you’ll understand why I keep coming back to this. And while it’s humble, it definitely earns its spot among those easy meals that feel like a small celebration. So, here’s the full scoop on how to get that crispy boneless chicken breast perfection, fast.
Why You’ll Love This Recipe
This crispy boneless chicken breast recipe is a total game-changer for quick dinners. After testing a bunch of versions, I landed on this one because it hits all the right notes without fuss. Here’s why it stands out:
- Quick & Easy: Ready in under 20 minutes, making it perfect for hectic weeknights or those last-minute cravings.
- Simple Ingredients: No need for fancy spices or weird items. You likely have everything in your pantry already.
- One-Pan Wonder: Minimal cleanup, which honestly feels like a small miracle after a day of cooking chaos.
- Crowd-Pleaser: Kids and adults alike keep asking for seconds — the crispy texture and juicy interior win everyone over.
- Unbelievably Delicious: That golden crust combined with tender chicken is comfort food with a little extra crunch.
What makes this recipe different is the balance between speed and texture. Instead of just pan-searing or baking, the trick lies in the heat and timing — getting that golden, crispy exterior without drying out the chicken. I also like to season the chicken lightly but thoughtfully, so the flavor really shines without overpowering. It’s the kind of meal where you can close your eyes after the first bite and smile because it’s just right. Plus, if you’ve ever struggled with chicken breasts turning tough or boring, this recipe will change your mind.
Whether you’re cooking for yourself after a long day or putting together a quick meal for friends, this recipe feels like a little culinary win every time. You might even find yourself craving it again and again — I know I did.
What Ingredients You Will Need
This recipe keeps things straightforward with simple, wholesome ingredients that work together to create bold flavor and satisfying texture without any fuss. Most of these are pantry staples, so no extra grocery runs required.
- Boneless, skinless chicken breasts (about 1 lb / 450 g) – pounded to even thickness for quick, even cooking
- All-purpose flour (¼ cup / 30 g) – helps create that crispy crust
- Salt (1 tsp) – basic seasoning that brings out the flavors
- Black pepper (½ tsp) – fresh ground if possible for best aroma
- Garlic powder (½ tsp) – adds a subtle savory note
- Paprika (½ tsp) – lends a mild smoky flavor and color
- Olive oil (2 tbsp) – for frying, I prefer a light, fruity brand like California Olive Ranch
- Unsalted butter (1 tbsp) – adds richness and helps with browning
- Lemon wedges (optional) – for finishing with a fresh zing
If you want to switch things up, you can swap the all-purpose flour for gluten-free flour or almond flour for a low-carb twist. For a dairy-free version, just omit the butter and use extra olive oil. If you like a bit more heat, a pinch of cayenne or chili powder works beautifully. When I make this in summer, I sometimes add fresh herbs like thyme or rosemary to the pan for an aromatic touch — it’s a nice change that still keeps things simple.
Equipment Needed
- Large skillet or frying pan: A heavy-bottomed nonstick or cast-iron pan is ideal for even heat and crisping. I usually use my seasoned cast-iron skillet because it gets nice and hot without sticking.
- Meat mallet or rolling pin: To pound the chicken breasts to an even thickness, which helps them cook evenly and quickly. If you don’t have a mallet, a heavy pan or even a sturdy can works in a pinch.
- Tongs: For flipping the chicken safely without piercing it, which keeps the juices locked in.
- Plate or shallow dish: To dredge the chicken in flour and seasoning before cooking.
If you don’t own a cast-iron skillet, no worries. A good-quality stainless steel pan will work just fine, though you might need to adjust the heat so the chicken doesn’t stick. For budget-friendly options, many stores carry basic nonstick skillets that hold up well for this kind of quick cooking. Just make sure it’s large enough to hold the chicken breasts without crowding, which helps maintain crispiness.
Preparation Method
- Prepare the chicken: Start by trimming any excess fat from the boneless chicken breasts. Place each breast between two sheets of plastic wrap or inside a zip-top bag. Using a meat mallet or rolling pin, gently pound the chicken to an even thickness of about ½ inch (1.25 cm). This step is key for fast, even cooking and juicy results. (5 minutes)
- Mix the seasoning and flour: In a shallow dish, combine the all-purpose flour, salt, black pepper, garlic powder, and paprika. Stir until everything is evenly mixed. This blend forms the crispy crust and adds flavor without being overwhelming. (2 minutes)
- Dredge the chicken: Lightly coat each chicken breast in the seasoned flour mixture, shaking off any excess. Too much flour can create a gummy crust, so be gentle here. Set the coated chicken aside on a plate. (3 minutes)
- Heat the pan: Place your skillet over medium-high heat. Add the olive oil and butter — you’ll see the butter foam a bit and the oil shimmer when it’s hot enough. This combo gives the chicken a rich flavor and deep golden color. (2 minutes)
- Cook the chicken: Carefully place the chicken breasts in the hot pan without crowding. Let them cook undisturbed for about 4-5 minutes or until the underside is golden brown and crispy. Flip using tongs and cook for another 4-5 minutes on the other side. The chicken should register 165°F (74°C) internally when done. (10 minutes)
- Rest and serve: Transfer the chicken to a plate and let it rest for 3-5 minutes — this helps the juices redistribute, keeping the meat tender. Serve with lemon wedges for a fresh pop of flavor if you like. (3 minutes)
If you notice the chicken browning too quickly, lower the heat slightly to avoid burning while still cooking through. If the flour crust starts to look pale, give the pan a little more time before flipping. Trust your eyes and nose — the smell of toasted spices and butter is a good sign. One tip I learned the hard way: don’t move the chicken around too much while cooking; letting it sit undisturbed is what creates that irresistible crust.
Cooking Tips & Techniques
Here’s the real talk on getting perfect crispy boneless chicken breasts every time:
- Even thickness is everything: I can’t stress enough how pounding the chicken makes a difference. Uneven pieces cook unevenly — you’ll get dry edges and undercooked centers otherwise.
- Don’t overcrowd the pan: Give each piece room to sizzle. Crowding traps steam and ruins crispiness.
- Use a mix of fat: Butter adds flavor and color, but it burns fast on its own. Combining it with olive oil raises the smoke point and keeps the crust perfect.
- Patience when cooking: Resist the urge to flip too soon. The crust needs time to form; flipping too early can cause sticking and tearing.
- Rest the meat: Letting it rest before slicing keeps the juices locked in. I learned this the hard way after slicing too soon and losing all that good moisture.
- Temp check: If you have a meat thermometer, use it! 165°F (74°C) is the safe internal temp, but the chicken will stay juicier if you pull it right at that mark.
When I’m multitasking dinner prep, I set a timer and prep side dishes like mashed potatoes or a quick salad while the chicken cooks. Speaking of sides, this chicken pairs wonderfully with simple roasted veggies or even a cheesy tater tot casserole — I bet you’d love the easy cheesy tater tot breakfast casserole for a cozy combo.
Variations & Adaptations
This recipe is a blank canvas for different tastes and dietary needs. Here are a few of my favorite tweaks:
- Herb-Crusted: Add chopped fresh herbs like thyme, rosemary, or parsley to the flour mix for a fragrant twist.
- Spicy Kick: Mix in cayenne pepper or smoked paprika to the seasoning for a little heat that wakes up the palate.
- Gluten-Free: Swap all-purpose flour with a gluten-free blend or almond flour. The crust texture changes slightly but still crisps nicely.
- Dairy-Free: Skip the butter and use extra olive oil or avocado oil to keep it dairy-free without losing richness.
- Oven Finish: For thicker chicken breasts, sear on the stove then finish in a 375°F (190°C) oven for 5-7 minutes to cook through without burning the crust.
One variation I tried recently was adding a quick honey mustard glaze just before serving — it was a hit with my family and gave the chicken a sweet-savory balance that’s surprisingly easy. If you like experimenting, try pairing this chicken with a smoky BBQ sauce like the one from my crispy BBQ bacon tater tot casserole for some seriously tasty mashup vibes.
Serving & Storage Suggestions
This crispy boneless chicken breast shines best right off the stove while the crust is still crunchy and the meat warm. Serve it with lemon wedges for a bright pop or alongside a fresh salad for a lighter meal. It also pairs well with creamy sides or roasted vegetables.
If you have leftovers, store them in an airtight container in the refrigerator for up to 3 days. To reheat, gently warm in a skillet over medium heat to help keep the crust crispy — microwave reheating tends to make it soggy (and nobody wants that). You can also slice the chicken cold for sandwiches or salads; the texture still holds up pretty well.
Flavors tend to mellow and blend after resting overnight, so if you prep this ahead for meal prep, the taste can deepen beautifully. Just remember to crisp it back up before serving if you want that original texture. For a quick side, I love pairing this chicken with a homemade creamy dip like the creamy buffalo chicken 7-layer dip — it’s a crowd-pleaser at any gathering.
Nutritional Information & Benefits
This recipe offers a balanced meal with lean protein and moderate fat. Here’s an estimated breakdown per serving (based on 4 servings):
| Nutrient | Amount |
|---|---|
| Calories | 280 |
| Protein | 35g |
| Fat | 12g |
| Carbohydrates | 8g |
| Fiber | 0.5g |
Chicken breast is a great source of lean protein that supports muscle repair and satiety. The olive oil and butter provide healthy fats that aid in nutrient absorption and add flavor. This recipe is naturally gluten-free if you swap the flour, and dairy-free if you adjust the fat choice, making it versatile for different dietary needs. Plus, it’s low-carb and fits well into many balanced eating plans. From a wellness perspective, having a quick, tasty protein option like this helps keep meals satisfying without resorting to processed shortcuts.
Conclusion
This crispy boneless chicken breast recipe is proof that simple ingredients and one good pan can deliver a meal that’s fast, flavorful, and downright addictive. Whether you’re cooking for yourself, feeding the family, or hosting last-minute guests, it’s a recipe you can rely on over and over. I love how it strikes that perfect balance between crunchy exterior and juicy inside — it never gets old.
Feel free to make it your own with the variations and tweaks that fit your taste buds or dietary needs. Cooking should be fun and flexible, and this recipe fits right in with that philosophy. If you try it, I’d love to hear how you customized your version or what sides you paired it with. Sharing those little wins is what makes the kitchen feel like home.
Here’s to many more quick, comforting dinners that don’t require a dozen pans or hours of prep. Happy cooking!
FAQs about Crispy Boneless Chicken Breast
How do I prevent the chicken from drying out?
Making sure the chicken breasts are pounded to even thickness helps them cook evenly and quickly, preventing dryness. Also, avoid overcooking by checking for an internal temperature of 165°F (74°C) and letting the meat rest before slicing.
Can I use bone-in chicken breasts for this recipe?
You can, but bone-in breasts will take longer to cook and may not crisp up as evenly in one pan. If you try it, sear on the stove then finish in the oven to cook through without burning the crust.
What if I don’t have a meat thermometer?
Cut into the thickest part of the chicken to check that the juices run clear and the meat is no longer pink. Cooking time varies with thickness, so keep a close eye on the crust color and texture.
Can this recipe be made gluten-free?
Absolutely! Use a gluten-free flour blend or almond flour instead of all-purpose flour. The crust might be a little different but still nicely crispy.
What sides go best with crispy boneless chicken breast?
Simple roasted veggies, mashed potatoes, or a fresh salad work great. For comfort food vibes, try pairing with the crispy buffalo chicken tater tot casserole for a hearty combo.
Pin This Recipe!
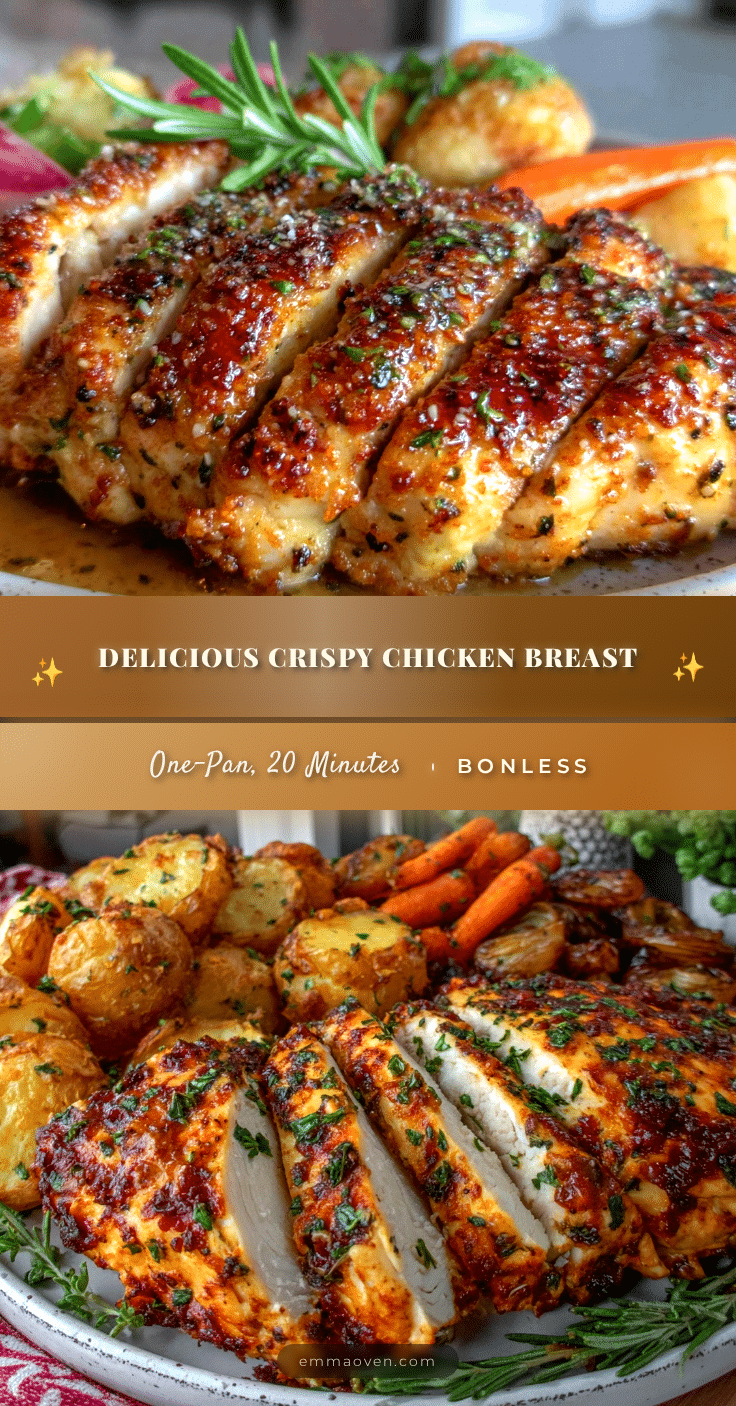
Crispy Boneless Chicken Breast Recipe 20 Minutes Easy One-Pan Wonder
A quick and easy one-pan recipe for crispy, juicy boneless chicken breasts ready in under 20 minutes, perfect for busy weeknights or last-minute dinners.
- Prep Time: 10 minutes
- Cook Time: 10 minutes
- Total Time: 20 minutes
- Yield: 4 servings 1x
- Category: Main Course
- Cuisine: American
Ingredients
- 1 lb boneless, skinless chicken breasts, pounded to even thickness
- 1/4 cup all-purpose flour (30 g)
- 1 tsp salt
- 1/2 tsp black pepper, freshly ground if possible
- 1/2 tsp garlic powder
- 1/2 tsp paprika
- 2 tbsp olive oil
- 1 tbsp unsalted butter
- Lemon wedges (optional)
Instructions
- Trim any excess fat from the chicken breasts. Place each breast between two sheets of plastic wrap or inside a zip-top bag. Using a meat mallet or rolling pin, gently pound the chicken to an even thickness of about 1/2 inch (1.25 cm). (5 minutes)
- In a shallow dish, combine the all-purpose flour, salt, black pepper, garlic powder, and paprika. Stir until evenly mixed. (2 minutes)
- Lightly coat each chicken breast in the seasoned flour mixture, shaking off any excess. Set aside on a plate. (3 minutes)
- Heat a large skillet over medium-high heat. Add olive oil and butter. Wait until the butter foams and the oil shimmers. (2 minutes)
- Place the chicken breasts in the hot pan without crowding. Cook undisturbed for 4-5 minutes until the underside is golden brown and crispy. Flip and cook another 4-5 minutes until cooked through and internal temperature reaches 165°F (74°C). (10 minutes)
- Transfer chicken to a plate and let rest for 3-5 minutes to redistribute juices. Serve with lemon wedges if desired. (3 minutes)
Notes
Pound chicken breasts to even thickness for even cooking and juiciness. Avoid overcrowding the pan to maintain crispiness. Use a mix of olive oil and butter for flavor and browning. Let chicken rest before slicing to keep juices locked in. Use a meat thermometer to ensure internal temperature reaches 165°F (74°C). For gluten-free, substitute flour with gluten-free or almond flour. For dairy-free, omit butter and increase olive oil. Optional variations include adding fresh herbs, cayenne for heat, or finishing thicker breasts in the oven at 375°F for 5-7 minutes.
Nutrition
- Serving Size: 1 chicken breast (ap
- Calories: 280
- Fat: 12
- Carbohydrates: 8
- Fiber: 0.5
- Protein: 35
Keywords: crispy chicken breast, boneless chicken, one-pan chicken, quick dinner, easy chicken recipe, weeknight meal