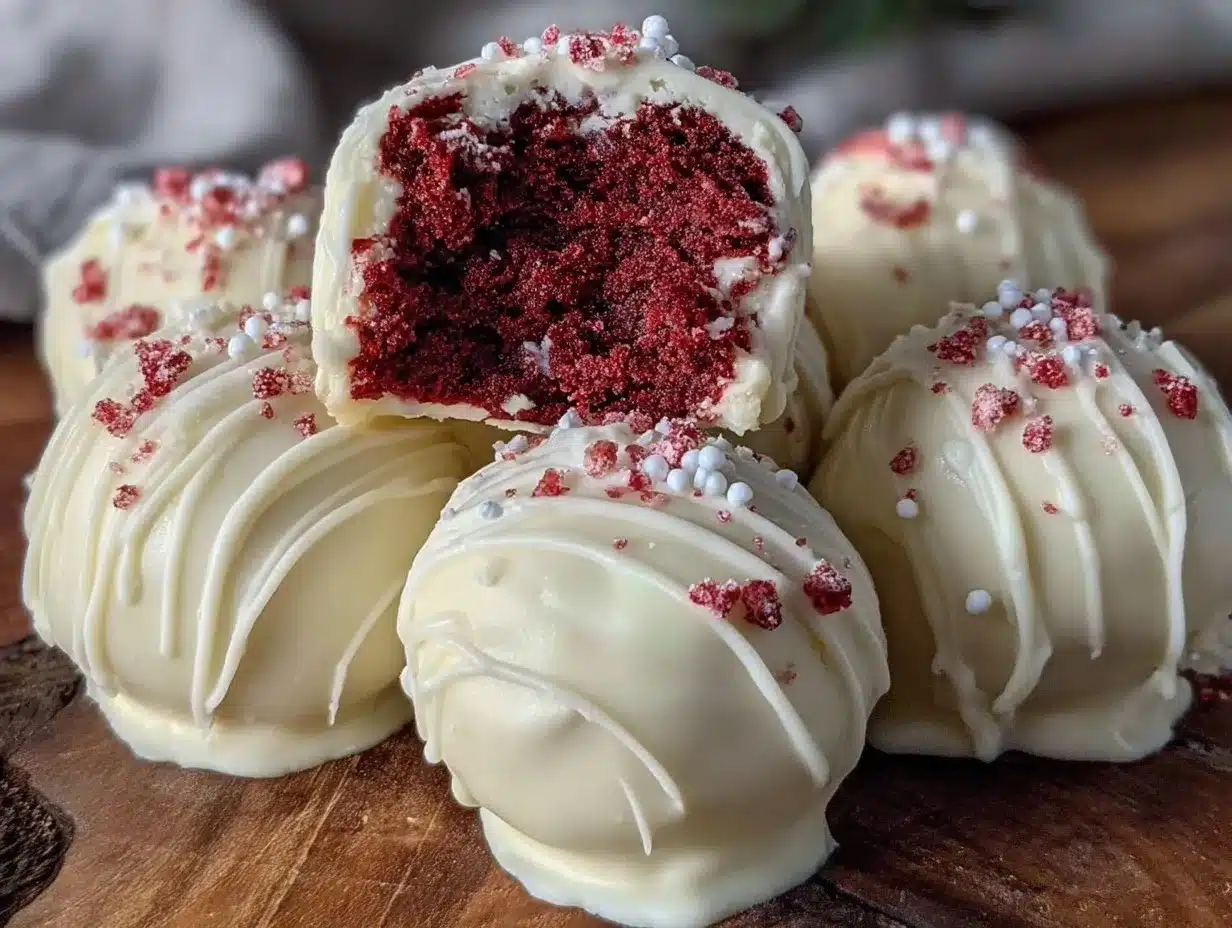
“You’ve got to try these cake pops,” my coworker insisted during a particularly hectic afternoon. I was skeptical—cake pops? Really? But that day, with a cluttered desk and a craving for something sweet, I gave in. The moment I bit into that creamy red velvet cake pop, coated in silky white chocolate, it was like a tiny celebration in my mouth. The texture was soft and moist, the red velvet flavor deep and comforting, and the white chocolate added just the right touch of sweetness without being overpowering. Honestly, it felt like a dessert magic trick—simple ingredients turned into an indulgent treat that felt fancy but was so easy to make. Ever since that accidental win, these red velvet cake pops have become my go-to for birthdays, last-minute parties, or just when I need a little cozy indulgence. The way the white chocolate shell snaps lightly before melting away into that creamy cake center? Let’s just say, it’s a small moment of joy that keeps me coming back to this recipe again and again.
One quiet afternoon, while waiting for a pot of tea to steep, I found myself tweaking the cream cheese frosting for the filling, making it a bit richer, a tad smoother. That’s when I realized this recipe isn’t just a quick treat; it’s something that sticks with you. It’s not flashy, but it’s got heart, like a familiar hug in dessert form. And the best part? You don’t have to be a pro baker to pull it off. This recipe stayed with me because it’s a rare kind of dessert that feels both special and utterly doable.
Why You’ll Love This Recipe
After testing and tweaking this recipe multiple times (yes, I made these red velvet cake pops more than a handful of times in one week), I’m confident it hits all the right notes. Here’s why it may become your new favorite dessert:
- Quick & Easy: From cake to pops, you’re looking at about 45 minutes total — perfect for a last-minute party or a sweet surprise.
- Simple Ingredients: You don’t need to hunt specialty stores; most items are pantry staples or easy to find at your local market.
- Perfect for Celebrations: Whether it’s a birthday, baby shower, or casual get-together, these cake pops bring charm and flavor alike.
- Crowd-Pleaser: Kids and adults alike can’t get enough — the creamy texture and white chocolate coating make them irresistible.
- Unbelievably Delicious: The creamy filling contrasts beautifully with the tender red velvet crumb and crisp white chocolate shell — it’s a texture and flavor combo that really stands out.
What makes this recipe different from your typical cake pop? The secret lies in the frosting mixed with the cake crumbs, making it creamy and moist, not dry or crumbly. Plus, using white chocolate (rather than plain candy melts) adds a real depth of flavor. Honestly, this is the kind of treat that makes you pause—close your eyes and savor the moment. It’s a little luxury that’s surprisingly easy to pull off, even on a busy night.
What Ingredients You Will Need
This recipe relies on straightforward, wholesome ingredients that come together to create a rich, creamy, and visually stunning treat. Most are pantry staples, making it convenient to whip up these cake pops anytime you want.
- Red Velvet Cake:
- All-purpose flour (about 2 cups / 250g) – the base for the tender crumb
- Cocoa powder (2 tablespoons) – just enough to add that subtle chocolate hint
- Baking soda (1 teaspoon) – for the perfect rise
- Salt (½ teaspoon) – balances the sweetness
- Unsalted butter, softened (½ cup / 115g) – adds richness
- Granulated sugar (1 cup / 200g) – sweetens and lightens the batter
- Eggs (2 large) – room temperature for better mixing
- Buttermilk (1 cup / 240ml) – makes the cake moist (if you don’t have buttermilk, mix 1 cup milk with 1 tablespoon vinegar)
- Red food coloring (2 tablespoons) – for that classic vibrant red
- Vanilla extract (1 teaspoon) – rounds out flavor
- White vinegar (1 teaspoon) – reacts with baking soda for lift
- Cream Cheese Frosting for Filling:
- Cream cheese, softened (8 oz / 225g) – the creamy heart of the filling
- Unsalted butter, softened (¼ cup / 60g) – for smoothness
- Powdered sugar (2 cups / 240g) – sweetens without grit
- Vanilla extract (1 teaspoon) – subtle flavor enhancer
- Coating:
- White chocolate chips or white chocolate bark (12 oz / 340g) – I prefer Ghirardelli for smooth melting and taste
- Vegetable shortening or coconut oil (1 tablespoon) – optional, to thin the chocolate for easier dipping
- Sprinkles or crushed nuts (optional) – for decoration and texture
- Extras:
- Lollipop sticks – sturdy and about 4 inches long
- Parchment paper or silicone baking mat – for drying the pops
You can swap regular flour with a gluten-free blend if needed, and use dairy-free cream cheese and butter substitutes for a vegan version. Just note the texture might shift slightly, but still delicious. For a seasonal twist, try adding orange zest to the frosting or swapping sprinkles for crushed peppermint in winter.
Equipment Needed
- Mixing bowls – a medium and a large one work best for cake and frosting
- Electric mixer or stand mixer – makes cream cheese frosting silky smooth (a hand whisk works, but takes longer)
- Baking pan (9×13 inch / 23×33 cm) – for baking the red velvet cake evenly
- Cooling rack – important for letting cake cool completely before crumbling
- Measuring cups and spoons – accuracy matters for baking success
- Microwave-safe bowl or double boiler – to melt white chocolate gently
- Lollipop sticks – choose sturdy ones to hold the cake pops without breaking
- Parchment paper or silicone baking mat – to set the dipped cake pops
If you don’t have a stand mixer, no worries—just give yourself extra time to beat the frosting by hand. For melting chocolate, I find a double boiler gives better control than the microwave, but microwaving in short bursts works fine too (just watch carefully to avoid burning). For budget-friendly options, reusable silicone mats can replace parchment paper and last for years.
Preparation Method
- Preheat your oven to 350°F (175°C). Grease the 9×13-inch baking pan and set aside. This ensures even baking and easy cake removal.
- Combine dry ingredients: In a medium bowl, sift together 2 cups (250g) all-purpose flour, 2 tablespoons cocoa powder, 1 teaspoon baking soda, and ½ teaspoon salt. Set aside. Sifting helps avoid lumps and creates a light crumb.
- Cream butter and sugar: Using an electric mixer, beat ½ cup (115g) softened unsalted butter with 1 cup (200g) sugar until fluffy and pale, about 3 minutes. It’s tempting to rush, but this step really impacts texture.
- Add eggs: Beat in 2 large room-temperature eggs, one at a time, mixing well after each. This adds structure and richness.
- Mix wet ingredients: In a separate small bowl, whisk 1 cup (240ml) buttermilk, 2 tablespoons red food coloring, 1 teaspoon vanilla extract, and 1 teaspoon white vinegar.
- Combine wet and dry: Alternately add dry ingredients and wet mixture to the butter mixture in 3 additions, starting and ending with dry. Mix gently until just combined—avoid overmixing to keep the cake tender.
- Bake: Pour batter into the prepared pan and smooth the top. Bake for 30-35 minutes, or until a toothpick inserted in the center comes out clean. The top should spring back lightly when pressed.
- Cool completely: Let the cake cool in the pan for 15 minutes, then transfer to a wire rack to cool fully. Don’t rush this step; warm cake will make the frosting melt prematurely.
- Prepare frosting: Beat 8 oz (225g) softened cream cheese with ¼ cup (60g) softened unsalted butter until smooth. Gradually add 2 cups (240g) powdered sugar and 1 teaspoon vanilla extract. Mix until creamy and fluffy.
- Crumble cake: Using your hands or a fork, crumble the cooled cake into fine crumbs in a large bowl.
- Mix cake and frosting: Add about ¾ cup of frosting to the crumbs and stir gently until well combined. The mixture should hold together when pressed without being too wet or dry. Add more frosting, a tablespoon at a time, if needed.
- Form balls: Scoop about 1.5 tablespoons (20g) of the mixture and roll into smooth balls. Place on a parchment-lined tray. Chill in the fridge for at least 30 minutes to firm up. This step helps the pops keep their shape when dipped.
- Melt white chocolate: In a microwave-safe bowl, melt 12 oz (340g) white chocolate chips with 1 tablespoon vegetable shortening in 30-second bursts, stirring frequently until smooth.
- Insert sticks: Dip the tip of each lollipop stick into melted chocolate, then insert halfway into each cake ball. This “glue” keeps the stick secure.
- Dip cake pops: Holding the stick, dip each cake ball into the melted white chocolate, letting excess drip off. Place back on parchment paper. Optionally, decorate with sprinkles or crushed nuts before chocolate sets.
- Let set: Allow the cake pops to harden at room temperature or pop them in the fridge for faster setting.
Pro tip: If the chocolate thickens during dipping, gently reheat in short bursts. Also, keep the cake pops chilled until just before serving for best texture.
Cooking Tips & Techniques
One thing I learned the hard way is that the texture of the cake pop mixture is everything. If it’s too dry, the pops crumble; too wet, and they fall apart when dipped. Mixing just the right amount of frosting is key. I often start with less frosting and add more gradually, feeling the mixture’s consistency as I go. Use room temperature ingredients to blend everything smoothly.
Melting the white chocolate gently is another important step. Overheating can cause it to seize or become grainy. Stirring often and using a double boiler method can save you from disasters. Also, the shortening thins the chocolate nicely, making dipping easier and giving a shinier finish.
Timing-wise, chilling the cake balls before dipping really helps. It firms them up so they don’t fall apart, and it also speeds up the chocolate setting once dipped. I usually make the cake pops a day ahead, which also lets the flavors meld together beautifully.
When decorating, work quickly but carefully. Sprinkles or nuts adhere best when the chocolate is still soft but not too runny. If you’re in a rush, setting the dipped pops in the fridge for 10 minutes before adding decorations helps prevent sliding.
Variations & Adaptations
While I love the classic creamy red velvet with white chocolate coating, these cake pops are surprisingly adaptable:
- Chocolate Coating Swap: Use dark or milk chocolate for a richer, less sweet finish. You can even drizzle contrasting chocolate on top for a decorative touch.
- Flavor Twists: Add a pinch of cinnamon or espresso powder to the cake batter for a subtle flavor boost. Or mix orange zest into the frosting for a fresh citrus note.
- Dietary Adjustments: For gluten-free, swap the flour for your favorite gluten-free blend. Vegan versions work well by using dairy-free cream cheese and butter, plus flax eggs or commercial egg replacers.
- Seasonal Decorations: Customize pops with crushed peppermint in winter, edible flowers in spring, or toasted coconut for a tropical vibe.
One variation I tried was dipping the cake pops in melted peanut butter chocolate and sprinkling chopped peanuts on top—a total game-changer for peanut butter lovers. For some extra fun, I recommend pairing these creamy cake pops with a rich hot chocolate or even alongside savory bites like the crispy buffalo chicken tater tot casserole to balance sweet and spicy.
Serving & Storage Suggestions
Serve these cake pops chilled or at room temperature for the best creamy texture. They make adorable party favors or a centerpiece for dessert tables. Present them upright in a pretty vase or foam block for easy grabbing.
If you need to store them, place cake pops in an airtight container and keep refrigerated for up to 5 days. For longer storage, they freeze well for up to 2 months. To thaw, let them sit in the fridge overnight—avoid microwaving or room temperature thawing, which can cause condensation and sogginess.
Reheat is generally not recommended as the white chocolate coating can melt unevenly, but if you want a softer bite, leave them at room temperature for 15 minutes before serving. Over time, the flavors deepen and the cake becomes even more tender, making leftovers quite a treat.
Nutritional Information & Benefits
Each red velvet cake pop (approximately 2 ounces / 57 grams) contains roughly:
| Calories | 220 kcal |
|---|---|
| Fat | 12g |
| Carbohydrates | 26g |
| Protein | 3g |
| Sugar | 18g |
The cream cheese provides calcium and protein, while the cocoa powder adds antioxidants. Of course, these are treats best enjoyed in moderation. For those watching gluten or dairy, the recipe adapts well with alternative ingredients, making it accessible for many dietary needs.
Conclusion
This creamy red velvet cake pops recipe is one of those rare desserts that feels special but is totally doable for any home cook. Whether you’re making them for an impromptu get-together or a planned party, they bring that perfect balance of moist cake, luscious frosting, and crisp white chocolate shell. I love how customizable they are—plus, they’re always a hit with friends and family without requiring hours in the kitchen. If you’ve ever enjoyed a red velvet cupcake but wanted something a little more fun and portable, these cake pops are your answer.
Give them a try, tweak the flavors to your liking, and don’t be shy about sharing your own spins. I’d love to hear how you make these your own or what party moments they’ve brightened. Sweet treats are better when shared, right?
Frequently Asked Questions
How do I prevent cake pops from falling off the sticks?
Make sure to chill the cake balls well before dipping and dip the stick tip in chocolate before inserting it into the cake ball. This “glue” helps keep them secure.
Can I use store-bought cake instead of baking from scratch?
Yes! Using a good-quality red velvet boxed cake mix or bakery cake can save time. Just crumble it finely and mix with cream cheese frosting as usual.
What if my white chocolate coating is too thick?
Add a small amount of vegetable shortening or coconut oil to thin it out. Gently reheat if it starts to harden during use.
Can I make these cake pops ahead of time?
Absolutely! They can be made 1-2 days ahead and stored in the fridge. For longer storage, freeze them and thaw in the fridge overnight.
How do I get smooth, even coatings on my cake pops?
Use smooth, melted chocolate and dip quickly but carefully. Tap off excess chocolate gently, and avoid swirling the pop in the coating, which can cause lumps.
And if you love easy, crowd-pleasing recipes, you might enjoy the easy cheesy tater tot breakfast casserole for a savory companion or the creamy buffalo chicken 7-layer dip for your game day snacks—both packed with flavor and super simple to make.
Pin This Recipe!

Creamy Red Velvet Cake Pops

These creamy red velvet cake pops are coated in silky white chocolate, offering a moist, tender crumb with a luscious cream cheese frosting center. Perfect for celebrations or a cozy indulgence, they are easy to make and irresistibly delicious.
- Prep Time: 15 minutes
- Cook Time: 35 minutes
- Total Time: 50 minutes
- Yield: 24 cake pops 1x
- Category: Dessert
- Cuisine: American
Ingredients
- 2 cups (250g) all-purpose flour
- 2 tablespoons cocoa powder
- 1 teaspoon baking soda
- ½ teaspoon salt
- ½ cup (115g) unsalted butter, softened
- 1 cup (200g) granulated sugar
- 2 large eggs, room temperature
- 1 cup (240ml) buttermilk (or 1 cup milk + 1 tablespoon vinegar)
- 2 tablespoons red food coloring
- 1 teaspoon vanilla extract
- 1 teaspoon white vinegar
- 8 oz (225g) cream cheese, softened
- ¼ cup (60g) unsalted butter, softened
- 2 cups (240g) powdered sugar
- 1 teaspoon vanilla extract
- 12 oz (340g) white chocolate chips or white chocolate bark
- 1 tablespoon vegetable shortening or coconut oil (optional)
- Sprinkles or crushed nuts (optional)
- Lollipop sticks (about 4 inches long)
- Parchment paper or silicone baking mat
Instructions
- Preheat oven to 350°F (175°C). Grease a 9×13-inch baking pan.
- Sift together flour, cocoa powder, baking soda, and salt in a medium bowl.
- Beat softened butter and sugar with an electric mixer until fluffy and pale, about 3 minutes.
- Add eggs one at a time, mixing well after each addition.
- Whisk buttermilk, red food coloring, vanilla extract, and white vinegar in a separate bowl.
- Alternately add dry ingredients and wet mixture to the butter mixture in three additions, starting and ending with dry ingredients. Mix gently until just combined.
- Pour batter into prepared pan and smooth the top. Bake 30-35 minutes or until a toothpick comes out clean.
- Cool cake in pan for 15 minutes, then transfer to a wire rack to cool completely.
- Beat cream cheese and softened butter until smooth. Gradually add powdered sugar and vanilla extract, mixing until creamy and fluffy.
- Crumble cooled cake into fine crumbs in a large bowl.
- Add about ¾ cup of frosting to crumbs and mix gently until mixture holds together. Add more frosting if needed, one tablespoon at a time.
- Scoop about 1.5 tablespoons (20g) of mixture and roll into balls. Place on parchment-lined tray and chill for at least 30 minutes.
- Melt white chocolate chips with vegetable shortening in 30-second bursts, stirring until smooth.
- Dip tip of each lollipop stick into melted chocolate and insert halfway into each cake ball.
- Dip each cake ball into melted white chocolate, letting excess drip off. Place on parchment paper and optionally decorate with sprinkles or crushed nuts.
- Allow cake pops to set at room temperature or refrigerate for faster setting.
Notes
Use room temperature ingredients for best mixing. Chill cake balls before dipping to prevent falling apart. Melt white chocolate gently to avoid seizing. Add vegetable shortening to thin chocolate if needed. Cake pops can be made 1-2 days ahead and stored refrigerated or frozen for longer storage. For vegan or gluten-free versions, substitute ingredients accordingly but expect slight texture changes.
Nutrition
- Serving Size: 1 cake pop (approxim
- Calories: 220
- Sugar: 18
- Fat: 12
- Carbohydrates: 26
- Protein: 3
Keywords: red velvet cake pops, creamy cake pops, white chocolate cake pops, easy cake pops, homemade cake pops, party desserts, cream cheese frosting