“You sure you want to try this sauce again?” my friend asked, eyeing the sticky glaze I’d just slathered over the chicken pieces. Honestly, I was skeptical myself. I’d been fiddling with yakitori sauces for weeks, trying to capture that elusive balance of sweet, savory, and smoky that makes Japanese yakitori chicken skewers so irresistible.
One late night, after a long day that left me craving something simple but satisfying, I pulled out some chicken thighs, skewers, and a few pantry staples. I didn’t expect much — just a quick, comforting dinner to reset my mood. But as the glaze caramelized over the grill pan, filling the kitchen with that unmistakable aroma of soy and mirin, I realized this was more than just another recipe. It was the kind of dish that invites you to pause, savor, and maybe even close your eyes after the first bite.
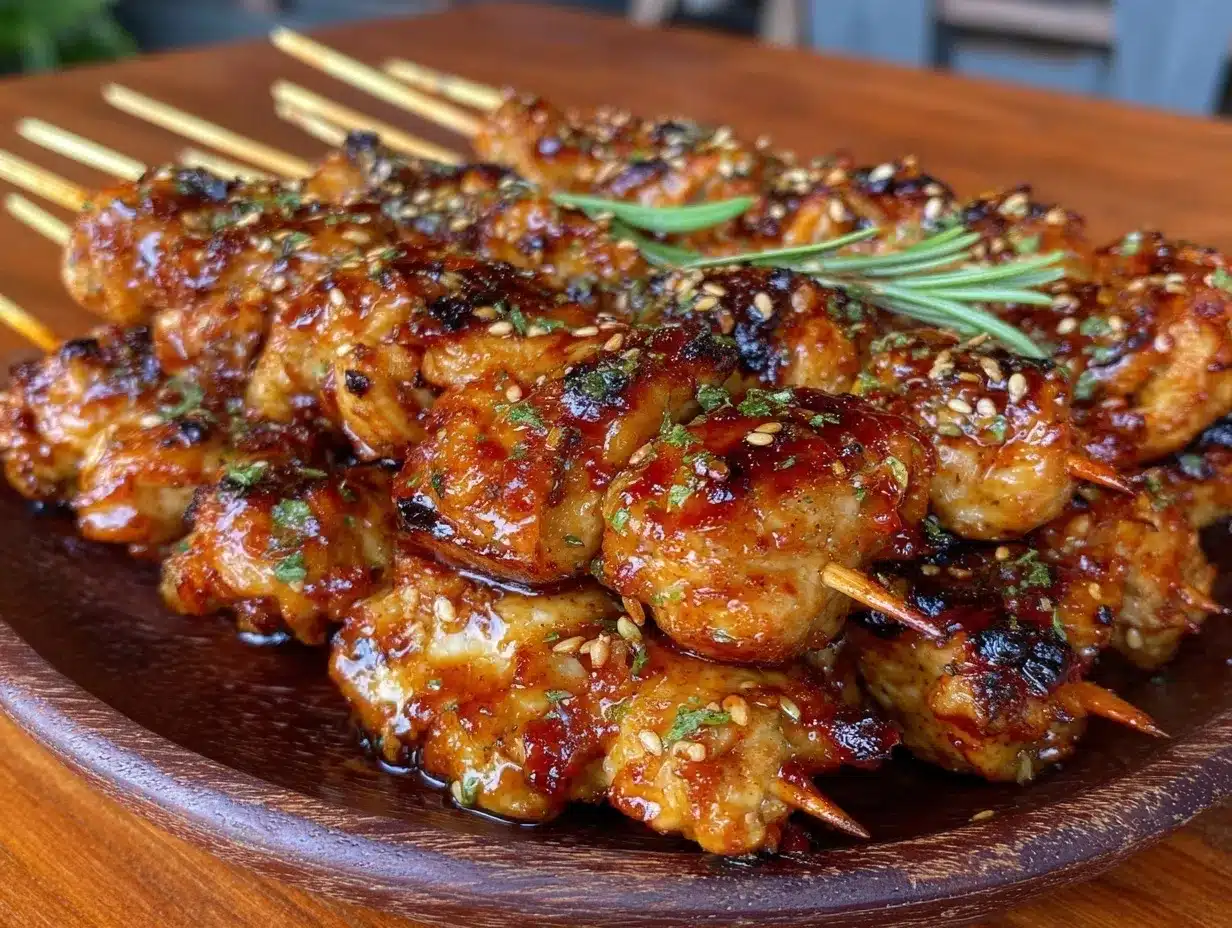
Since then, I’ve made these flavorful Japanese yakitori chicken skewers with sticky glaze so many times that the recipe feels like an old friend. They’re easy enough for a weeknight, yet impressive enough for when friends drop by unexpectedly. The glaze? It’s got that perfect sticky, tangy finish that clings lovingly to every piece of tender chicken.
What really stuck with me is how this recipe turned a simple collection of ingredients into something memorable — no fancy tools or hard-to-find items, just a little patience and love. It’s exactly the kind of recipe I keep coming back to when I want comfort food that doesn’t feel heavy but still hits all the right notes.
Why You’ll Love This Recipe
If you’ve been hunting for a Japanese yakitori chicken skewers recipe that nails the classic sticky glaze without fuss, this one’s got your name on it. From my time experimenting in the kitchen, here’s why it’s become an all-time favorite:
- Quick & Easy: You can have these skewers ready in under 30 minutes — perfect when you want something tasty without the wait.
- Simple Ingredients: No exotic or hard-to-find items here. Most of the ingredients are pantry staples, so you can whip this up anytime.
- Perfect for Casual Gatherings: Whether it’s a laid-back evening or a last-minute get-together, these skewers impress without stress.
- Crowd-Pleaser: The sticky glaze and tender chicken combo is a hit with both kids and adults alike — trust me, they’ll be asking for seconds.
- Unbelievably Delicious: The glaze’s sweet-savory depth complements the smoky char beautifully, giving you that authentic yakitori charm.
What sets this apart from other yakitori recipes? It’s the balance — the sticky glaze is rich but not overpowering, with just enough tang from the mirin and a subtle hint of ginger to keep things lively. The technique of slowly basting the chicken while grilling ensures every bite is glossy and packed with flavor.
Honestly, after making this recipe a handful of times in one week (yes, I got a little obsessed), I can say it’s the kind of dish that feels like a little celebration on a skewer — comforting, satisfying, and refreshingly simple.
What Ingredients You Will Need
This yakitori chicken skewers recipe uses straightforward, wholesome ingredients to build a bold flavor profile and sticky, irresistible glaze. Most of these are pantry staples, but each plays a crucial role in layering flavor and texture.
- For the Chicken Skewers:
- Boneless, skin-on chicken thighs (about 1 lb / 450g) — thighs stay juicy and tender, and the skin crisps up nicely
- Bamboo or metal skewers (soaked if bamboo to prevent burning)
- Green onions/scallions, cut into 1-inch pieces (optional, adds freshness and a mild bite)
- For the Sticky Yakitori Glaze:
- Soy sauce (¼ cup / 60ml) — I prefer Kikkoman for its balance of saltiness and umami
- Mirin (¼ cup / 60ml) — Japanese sweet rice wine for that signature sweetness and shine
- Sake (¼ cup / 60ml) — adds depth and subtle complexity
- Granulated sugar (2 tbsp / 25g) — helps create the sticky caramelized finish
- Fresh ginger, finely grated (1 tsp) — brightens the glaze with a gentle zing
- Garlic, minced (1 clove) — adds savory warmth (optional but recommended)
Substitution tips: For a gluten-free version, swap soy sauce with tamari or coconut aminos. If you want to avoid alcohol, you can replace sake and mirin with a mix of apple juice and rice vinegar, though the flavor won’t be quite the same.
When selecting chicken, I always go for skin-on thighs because they give you that juicy, flavorful bite with a nice crispy edge. If you prefer white meat, breast works too, but be careful not to overcook it — it dries out faster.
Equipment Needed
- Grill pan or outdoor grill — I often use a cast iron grill pan for that perfect sear and grill marks indoors
- Mixing bowls — for combining the glaze ingredients and marinating
- Brush — a small silicone or pastry brush to baste the glaze during cooking
- Measuring cups and spoons — for accurate sauce ratios
- Tongs — handy for turning skewers evenly without piercing the meat
If you don’t have a grill pan, a regular skillet works, but you won’t get those lovely char lines. For budget-friendly skewers, bamboo ones are great; just soak them in water for at least 30 minutes before using to prevent burning.
Over the years, I’ve found that a sturdy grill pan is worth the investment for yakitori and other grilled dishes — it holds heat well and gives that authentic grilled flavor even in colder months.
Preparation Method
- Prep the Chicken: Trim excess fat from the chicken thighs and cut them into 1.5-inch (3.8 cm) pieces. Pat dry with paper towels — this helps with browning. If you’re adding green onions, cut them into 1-inch (2.5 cm) pieces now.
- Make the Yakitori Glaze: In a small saucepan, combine soy sauce, mirin, sake, sugar, grated ginger, and minced garlic. Bring to a gentle simmer over medium heat and cook for 8-10 minutes, stirring occasionally, until the sauce thickens slightly and becomes glossy. It should coat the back of a spoon. Remove from heat and set aside to cool.
- Skewer the Chicken: Thread the chicken pieces onto the soaked skewers, alternating with green onion pieces if using. Don’t pack too tightly; leave a little space so heat circulates evenly.
- Preheat the Grill Pan: Heat your grill pan over medium-high heat until hot (about 5 minutes). Lightly oil the pan or brush the chicken with a bit of oil to prevent sticking.
- Cook the Skewers: Place the skewers on the grill pan. Cook for 3-4 minutes on one side until nicely browned, then turn.
- Baste and Finish: Brush the chicken with the sticky yakitori glaze, then cook for another 3-4 minutes, flipping and basting every 2 minutes. The glaze should thicken and become sticky, clinging to the chicken. Watch closely to avoid burning the sugar.
- Check Doneness: The chicken is cooked when the internal temperature reaches 165°F (74°C) or the juices run clear. The glaze will be sticky and shiny, with a slight char in spots.
- Rest and Serve: Remove skewers from the pan and let them rest for a couple of minutes. This helps the juices redistribute and the glaze set perfectly.
Pro tip: If the glaze thickens too much while basting, warm it gently on the stove to loosen it. And don’t rush the basting — repeated layers of glaze build that signature sticky texture.
Cooking Tips & Techniques
Cooking yakitori chicken skewers with that perfect sticky glaze requires a little patience and attention to detail. Here are some tips from my kitchen trials:
- Use Chicken Thighs: They stay juicy and flavorful, unlike breasts that can dry out quickly. Skin-on thighs add a nice crispy texture when grilled.
- Don’t Overcrowd the Skewers: Leaving small gaps between pieces helps heat circulate and cooks the chicken evenly.
- Slow and Steady Basting: Apply the glaze in layers while cooking. This builds a sticky, caramelized coating without burning the sugars.
- Control Your Heat: Medium to medium-high heat works best. Too hot and the glaze burns; too low and the chicken steams rather than grills.
- Use a Thermometer: For best results, check the chicken’s internal temperature. This avoids guesswork and ensures juicy, safe-to-eat skewers every time.
- Resting Matters: Letting the skewers rest for a few minutes after cooking helps the glaze set and juices redistribute, making each bite tender and flavorful.
I remember the first time I rushed the glaze and ended up with a bitter burnt mess — lesson learned! Also, if you’re juggling multiple dishes, prepping the glaze ahead saves time and stress.
Variations & Adaptations
This yakitori recipe is wonderfully flexible, ready to adapt to your preferences or what’s in your fridge:
- Vegetarian Version: Swap chicken for firm tofu or mushrooms like shiitake or king oyster. Use the same glaze and grill carefully to avoid breaking the tofu.
- Spicy Twist: Add a pinch of chili flakes or a drizzle of sriracha to the glaze for a kick. I sometimes toss a bit of togarashi spice on the finished skewers for extra heat.
- Low-Sodium Option: Use low-sodium soy sauce and reduce the added sugar slightly. You can balance with a splash of fresh orange juice for brightness.
- Alternative Cooking Methods: If you don’t have a grill or grill pan, broiling works well. Just keep a close eye to avoid charring the glaze too much.
- Personal Variation: Once, I added chunks of pineapple between chicken pieces — the sweet acidity paired surprisingly well with the sticky glaze and smoky char.
Serving & Storage Suggestions
These flavorful Japanese yakitori chicken skewers are best served warm, right off the grill, when the glaze is shiny and sticky. I like to plate them with a simple side of steamed rice or a crisp Asian slaw to cut through the richness.
For a casual snack setup, they also pair beautifully with some crunchy edamame or a refreshing cucumber salad. If you’re planning a game day menu, these skewers can be a star alongside other finger foods like crispy buffalo chicken tater tot casserole — the sweet-savory contrast is a real crowd-pleaser.
To store leftovers, cool the skewers completely before wrapping tightly in plastic wrap or placing in an airtight container. They keep well in the fridge for up to 3 days.
Reheat gently in a skillet over medium heat to avoid drying out the chicken, brushing with a little extra glaze or soy sauce to revive that sticky coating. You can also warm them in the oven at 350°F (175°C) for about 10 minutes.
Flavors actually deepen after a day in the fridge, so if you have patience, making them a day ahead can be a smart move for parties or meal prep.
Nutritional Information & Benefits
Each serving of these yakitori chicken skewers (about 2 skewers) contains roughly:
| Calories | 280 kcal |
|---|---|
| Protein | 25 g |
| Fat | 15 g |
| Carbohydrates | 10 g |
| Sugar | 7 g |
The chicken thighs provide a good source of protein and healthy fats, while the glaze adds moderate carbs primarily from the sugar and mirin. Using skin-on chicken adds flavor and some extra fat but keeps the meat moist and satisfying.
For those mindful of gluten, swapping soy sauce with tamari makes this recipe gluten-free. The dish is naturally low in carbs and can fit well into balanced eating plans.
One of the benefits of this recipe is that it uses fresh ginger and garlic, which have natural anti-inflammatory and immune-supporting properties — a little bonus alongside the deliciousness.
Conclusion
These flavorful Japanese yakitori chicken skewers with sticky glaze have become a go-to recipe in my kitchen for good reason. They’re simple, quick, and deliver that perfect combination of sweet, savory, and smoky that hits the spot every time.
Don’t hesitate to tweak the glaze or try variations to suit your taste — whether you like a bit of heat, a vegetarian twist, or a lower-sodium version, this recipe welcomes your creativity.
Personally, I love how this dish brings a little bit of Japan’s street food charm to my home without complicated steps. It’s the kind of recipe that feels like a small celebration on a skewer, no matter the occasion.
If you give it a try, I’d love to hear how you customize it or what sides you pair it with. Sharing those moments makes cooking even more fun.
Happy grilling, and may your kitchen be filled with that irresistible yakitori aroma soon!
Frequently Asked Questions
Can I use chicken breast instead of thighs for yakitori?
Yes, chicken breast works, but it cooks faster and can dry out easily. Keep a close eye when grilling and consider marinating longer to keep it moist.
How long should I soak bamboo skewers before using?
Soak bamboo skewers in water for at least 30 minutes before grilling. This prevents them from burning or catching fire on the grill.
Can I make the yakitori glaze ahead of time?
Absolutely! The glaze keeps well in the fridge for up to a week. Warm it gently before using to loosen any thickening.
What’s the best way to get a sticky glaze without burning the sugar?
Cook the glaze on medium heat and baste frequently in thin layers. Avoid high heat, which can burn the sugars quickly.
Are there any good side dishes to serve with yakitori chicken skewers?
Yes! Steamed rice, Asian-style slaws, or simple cucumber salads pair beautifully. You might also enjoy them alongside dishes like pulled chicken sliders for a flavorful spread.
Pin This Recipe!

Flavorful Japanese Yakitori Chicken Skewers Recipe Easy Sticky Glaze

These Japanese yakitori chicken skewers feature a perfect sticky, tangy glaze that clings to tender chicken thighs, delivering a sweet-savory and smoky flavor. Quick and easy to prepare, they are perfect for weeknights or casual gatherings.
- Prep Time: 10 minutes
- Cook Time: 15 minutes
- Total Time: 25 minutes
- Yield: 4 servings 1x
- Category: Main Course
- Cuisine: Japanese
Ingredients
- 1 lb boneless, skin-on chicken thighs
- Bamboo or metal skewers (soaked if bamboo to prevent burning)
- Green onions/scallions, cut into 1-inch pieces (optional)
- 1/4 cup soy sauce (60 ml)
- 1/4 cup mirin (60 ml)
- 1/4 cup sake (60 ml)
- 2 tbsp granulated sugar (25 g)
- 1 tsp fresh ginger, finely grated
- 1 clove garlic, minced (optional)
Instructions
- Trim excess fat from the chicken thighs and cut into 1.5-inch pieces. Pat dry with paper towels. If using green onions, cut into 1-inch pieces.
- In a small saucepan, combine soy sauce, mirin, sake, sugar, grated ginger, and minced garlic. Bring to a gentle simmer over medium heat and cook for 8-10 minutes, stirring occasionally, until the sauce thickens slightly and becomes glossy. Remove from heat and set aside to cool.
- Thread the chicken pieces onto the soaked skewers, alternating with green onion pieces if using. Leave small spaces between pieces.
- Preheat grill pan over medium-high heat until hot (about 5 minutes). Lightly oil the pan or brush chicken with oil to prevent sticking.
- Place skewers on the grill pan. Cook for 3-4 minutes on one side until browned, then turn.
- Brush chicken with the yakitori glaze and cook for another 3-4 minutes, flipping and basting every 2 minutes until glaze is sticky and caramelized. Watch closely to avoid burning.
- Check doneness: chicken is cooked when internal temperature reaches 165°F (74°C) or juices run clear.
- Remove skewers from pan and let rest for a couple of minutes before serving.
Notes
Soak bamboo skewers in water for at least 30 minutes before grilling to prevent burning. Use chicken thighs for juiciness and crispy skin. Baste glaze in thin layers slowly to build sticky texture without burning. Use a thermometer to ensure chicken is cooked to 165°F. Rest skewers before serving to let juices redistribute. Glaze can be made ahead and stored in fridge up to a week.
Nutrition
- Serving Size: About 2 skewers per
- Calories: 280
- Sugar: 7
- Fat: 15
- Carbohydrates: 10
- Protein: 25
Keywords: yakitori, chicken skewers, Japanese recipe, sticky glaze, grilled chicken, easy dinner, savory, sweet, smoky