Introduction
“Hey, you tried making those fish-shaped cakes yet?” my friend texted out of the blue one chilly afternoon. I’d been wrestling with what to whip up that felt both fun and comforting, something to shake off the day’s dreariness. Honestly, I was skeptical at first—homemade taiyaki? I pictured a complicated mess, sticky batter, and maybe a sad attempt at that iconic fish shape. But curiosity got the better of me.
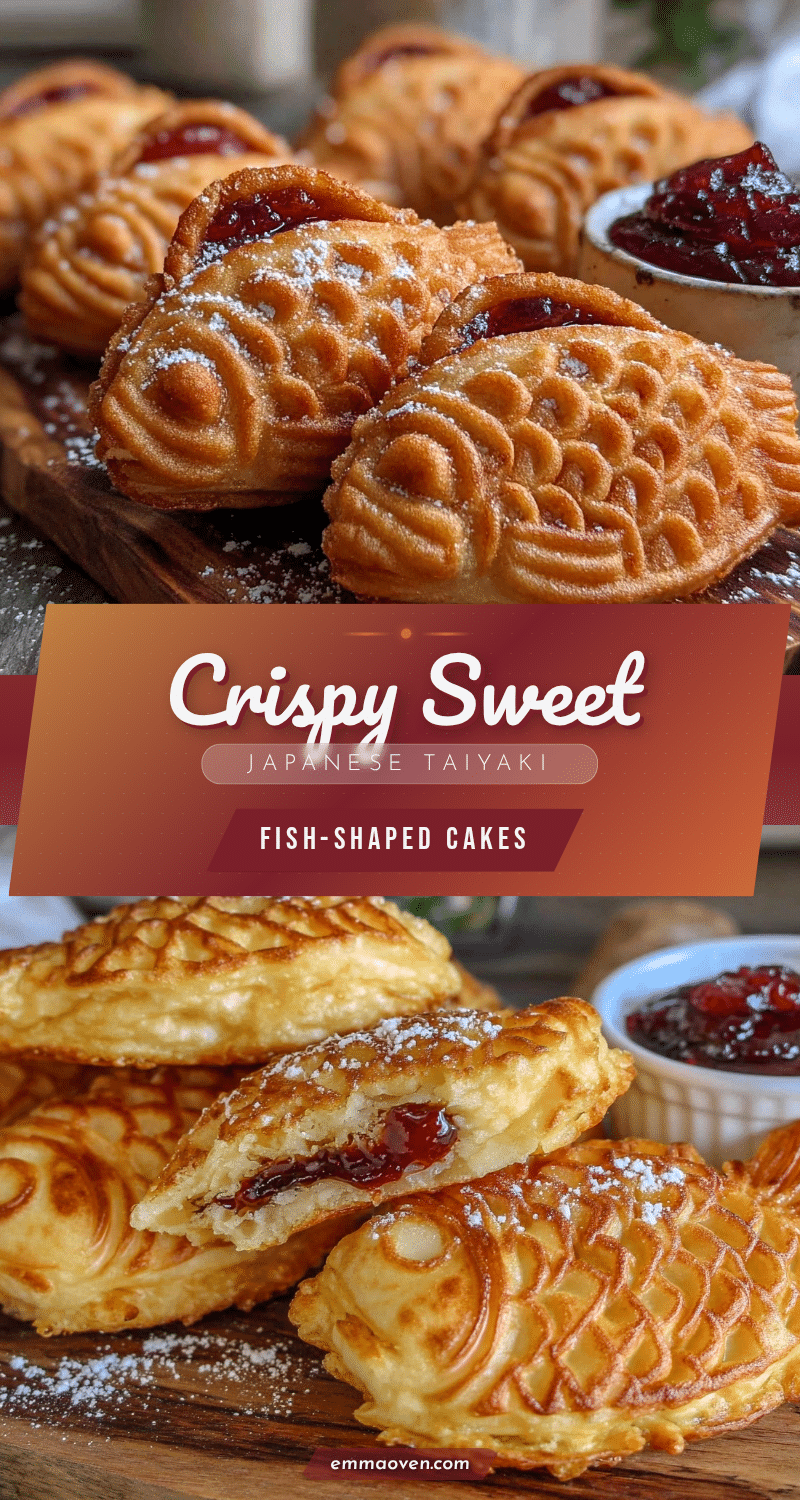
That night, with the kitchen dimly lit and a lingering smell of toasted batter on the air, I finally nailed these crispy Japanese taiyaki fish-shaped cakes stuffed with sweet red bean filling. The crispy exterior gave way to soft, warm sweetness inside, perfectly balanced and oddly satisfying. Each bite seemed to whisper stories of street vendors in Tokyo and quiet moments shared over warm treats.
Turns out, this recipe is approachable—even for someone who’s “not really a baker” like me—and the little fish shapes made the whole process feel playful. It’s become my go-to comfort snack, especially after hectic days when I just want something soothing but a little special. I love how the subtle crunch keeps you guessing, the sweet red bean paste melts in your mouth, and the nostalgia wraps around you like a cozy blanket. This is more than just a recipe; it’s a quiet invitation to slow down and savor a moment that’s sweet and simple.
Why You’ll Love This Recipe
- Quick & Easy: Comes together in about 30 minutes, so you can satisfy those sudden sweet cravings without fuss.
- Simple Ingredients: Everything’s pantry-friendly, and the star—sweet red bean paste—is easy to find or make at home.
- Perfect for Sharing: Whether for a casual tea time or a cozy family night, these taiyaki are sure to charm.
- Crowd-Pleaser: Kids, adults, anyone who tries these ends up asking for more—the crispy shell and sweet filling combo is a winner.
- Authentic Yet Adaptable: This version captures the essence of traditional taiyaki but lets you tweak the filling or batter to suit your mood.
What sets this recipe apart? The magic lies in getting the batter just right—light, crisp, and golden. I’ve tested this multiple times, adjusting ingredient ratios and cooking times to hit that perfect texture. Plus, the sweet red bean filling isn’t just dolloped in; it’s spooned with care to keep every bite balanced and luscious.
Honestly, these fish-shaped cakes aren’t just treats; they’re little moments of joy. The kind that make you close your eyes after the first bite, savoring that warm, sweet surprise inside. They’re perfect for impressing guests without any stress or simply turning an ordinary afternoon into something memorable.
What Ingredients You Will Need
This recipe uses simple, wholesome ingredients to deliver bold flavor and satisfying texture without the fuss. Most are pantry staples, and a few can be swapped based on what you have on hand.
- For the Batter:
- All-purpose flour – 1 cup (120 g)
- Baking powder – 1 tsp (4 g) (for lightness)
- Granulated sugar – 2 tbsp (25 g) (adds just a touch of sweetness)
- Salt – a pinch (balances flavors)
- Egg – 1 large, room temperature
- Milk – 3/4 cup (180 ml) (whole milk works best, but any dairy or non-dairy will do)
- Vegetable oil – 1 tbsp (15 ml) (keeps the batter tender)
- For the Filling:
- Sweet red bean paste (anko) – 3/4 cup (200 g) (I recommend buying good-quality paste from brands like Oh! Yummy or Imuraya, or you can make your own for a fresh touch)
- Optional Toppings or Variations:
- Sweetened chestnut pieces – 1/4 cup (optional, adds texture)
- Matcha powder – 1 tsp (to add a subtle earthy flavor to the batter)
For a gluten-free alternative, almond flour or a gluten-free baking mix can be used, but texture might differ slightly. If you want to skip the red bean, custard or chocolate filling also works beautifully. In summer, fresh fruit jams can replace the paste for a seasonal twist.
Equipment Needed

- Taiyaki pan or fish-shaped mold – this is essential for the classic shape and crispy texture. If you don’t have one, a waffle iron or even a regular griddle with a fish-shaped silicone mold can work as a substitute.
- Mixing bowls – one large for batter, one small for eggs.
- Whisk or electric mixer – to keep your batter lump-free.
- Spatula or wooden spoon – for folding ingredients gently.
- Measuring cups and spoons – precision makes a difference in batter texture.
- Cooking brush or paper towel – to lightly oil the pan for easy release.
I’ve tried different taiyaki pans over the years—cast iron types give a nice even heat but need seasoning and care, while non-stick aluminum versions heat quickly and clean up easily. For budget-friendly options, you can find electric taiyaki makers online for under $30. Just remember to oil the pan between each batch to keep your cakes crisp and perfect.
Preparation Method
- Prepare the batter: In a large bowl, sift together 1 cup (120 g) all-purpose flour, 1 tsp (4 g) baking powder, 2 tbsp (25 g) granulated sugar, and a pinch of salt. Whisk to combine evenly.
- Mix wet ingredients: In a separate bowl, beat 1 large egg with 3/4 cup (180 ml) milk and 1 tbsp (15 ml) vegetable oil until smooth. If you want to add matcha, sift it into the dry ingredients before mixing.
- Combine wet and dry: Slowly pour wet ingredients into the dry mix, whisking gently to avoid lumps. The batter should be smooth and slightly thick, like pancake batter. Rest for 5 minutes to let the baking powder activate (you’ll notice tiny bubbles forming).
- Heat your taiyaki pan: Place over medium heat and brush both sides lightly with oil. This prevents sticking and helps achieve that golden crisp.
- Fill the molds: Pour a small amount of batter (about 2 tbsp or 30 ml) into one side of the fish mold, spreading evenly but not overfilling. Add about 1 tbsp (15 g) of sweet red bean paste in the center, then cover with another 2 tbsp (30 ml) of batter to seal the filling inside.
- Close the mold and cook: Press the pan closed and cook for about 3-4 minutes on one side. Flip carefully and cook for another 3-4 minutes. The taiyaki should be golden brown and crispy, with the filling warm and soft inside.
- Remove and cool: Use a fork or chopsticks to gently pry the fish cakes out. Place on a wire rack for a minute to cool slightly—this keeps them from getting soggy.
- Repeat: Continue with the remaining batter and filling, oiling the pan as needed. Enjoy warm for the best texture and flavor.
If the batter spreads too thin, add a bit more flour next time; if it’s too thick, a splash more milk helps. The key is balancing the batter so it crisps without burning before the inside cooks through. After a few tries, you’ll get a feel for your pan’s heat and timing.
Cooking Tips & Techniques
Getting that perfect crisp shell with a soft filling inside is all about heat control and timing. Medium heat works best to avoid burnt edges and undercooked centers. Don’t rush the flip—wait until the bottom is golden and releases easily.
When spooning the red bean paste, be careful not to let it touch the edges of the mold, or it might leak and stick. I learned this the hard way, ending up with a sticky mess that was still tasty but less pretty.
To speed things up, prep your batter and filling ahead of time, and keep the filling chilled but not frozen. You can even make the red bean paste from scratch or buy ready-made—both work well, though homemade tends to be less sweet and more textured.
Keep a kitchen towel nearby for quick cleanups, especially if you’re new to taiyaki pans. And if you want to multitask, try warming a pot of tea or coffee while cooking—nothing beats that combo of crispy sweet cakes and a warm drink.
I also recommend experimenting with your pan’s seasoning. Cast iron pans develop a better non-stick surface the more you use and care for them. Avoid soap and dry immediately after washing to keep the seasoning intact.
Variations & Adaptations
- Custard-Filled Taiyaki: Swap the red bean paste for vanilla custard or pastry cream for a creamy twist that’s just as beloved.
- Chocolate Lover’s Edition: Add cocoa powder to the batter and fill with chocolate ganache or Nutella. This one’s a hit with kids and chocoholics alike.
- Savory Taiyaki: For a completely different vibe, replace the sweet filling with melted cheese and cooked sausage or vegetables. It’s a fun spin for snack lovers.
- Gluten-Free Version: Use almond or rice flour blends in place of all-purpose flour. The texture will be slightly different but still delicious.
- Seasonal Fruits: In warmer months, fresh berries or sweetened apple slices make a refreshing filling alternative.
Personally, I’ve tried the custard variation many times, especially when serving breakfast or brunch alongside dishes like my easy cheesy tater tot breakfast casserole. It’s a beautiful contrast of creamy and crisp textures that guests love.
Serving & Storage Suggestions
Serve your crispy Japanese taiyaki warm or at room temperature for the best flavor and texture. They make a charming snack alongside a cup of green tea or coffee, perfect for afternoon breaks or casual gatherings.
For a fun presentation, arrange them on a platter with fresh fruit or a dusting of powdered sugar. They’re also great served with a side of whipped cream or a drizzle of honey for extra sweetness.
To store, place cooled taiyaki in an airtight container in the refrigerator for up to 2 days. Reheat gently in a toaster oven or skillet to regain crispness—microwaving tends to make them soggy.
If you want to freeze them, wrap each individually in plastic wrap and place in a freezer bag for up to a month. Thaw at room temperature and reheat as above.
Flavors develop nicely overnight, with the filling becoming even richer. Just be mindful of reheating to keep that delightful crisp shell intact.
Nutritional Information & Benefits
Each taiyaki fish-shaped cake contains approximately 150-180 calories, depending on the filling and size. They offer a moderate amount of carbohydrates and a small protein boost from the egg and milk in the batter.
The sweet red bean paste is rich in fiber and antioxidants, making it a nourishing choice compared to many other dessert fillings. Red beans also provide iron and plant-based protein.
This recipe can fit into a balanced diet, especially when enjoyed as an occasional treat. Using whole milk or dairy alternatives can adjust fat content to suit your preferences.
For those with dietary restrictions, the recipe can be adapted gluten-free or dairy-free without losing the core flavors and textures.
Personally, I appreciate taiyaki as a sweet snack that feels indulgent but still connected to wholesome ingredients and traditional flavors.
Conclusion
This crispy Japanese taiyaki recipe with sweet red bean filling is a little kitchen adventure that’s totally worth the effort. It’s approachable, fun, and the results are always heartwarming. Whether you’re crafting a cozy moment after a long day or surprising friends with a whimsical treat, these fish-shaped cakes deliver.
Feel free to make it your own—try different fillings or tweak the batter to your taste. I love how this recipe invites creativity and comfort in equal measure. It’s become a staple for me when I want something both nostalgic and fresh.
If you give it a go, I’d love to hear how it turns out or what variations you try. Sharing recipes like this reminds me why cooking is such a joy—simple moments made special with a little care and a crispy crunch.
Frequently Asked Questions
What can I use if I don’t have a taiyaki pan?
You can try a waffle iron or a regular griddle paired with silicone fish-shaped molds. Though it won’t be exactly the same, it still yields tasty, shaped cakes.
Can I make the red bean paste from scratch?
Absolutely! Soak azuki beans overnight, boil until soft, then mash with sugar to taste. It takes more time but the flavor is unbeatable.
How do I keep the taiyaki crispy after cooking?
Cool them on a wire rack to avoid sogginess. Reheat in a toaster oven or skillet rather than a microwave to maintain crispness.
Is there a vegan version of this recipe?
Yes. Use plant-based milk like almond or oat milk and replace the egg with a flax egg or applesauce. Choose vegan red bean paste or make your own.
Can I store leftover taiyaki in the freezer?
Definitely. Wrap each cake individually and freeze for up to one month. Thaw at room temperature and reheat gently before serving.
For those who enjoy hearty, comforting meals alongside delightful snacks, you might appreciate the balance of crispy textures in recipes like the crispy buffalo chicken tater tot casserole or the crispy cheesy tater tot ranch bake. Both bring a different kind of comfort but share that satisfying crunch that makes eating fun.
Pin This Recipe!
Crispy Japanese Taiyaki Recipe Easy Homemade Fish-Shaped Cakes with Sweet Red Bean Filling

This recipe creates crispy Japanese taiyaki fish-shaped cakes stuffed with sweet red bean filling, offering a perfect balance of a crunchy exterior and warm, sweet interior. It’s approachable, fun, and perfect for a comforting snack or casual gatherings.
- Prep Time: 10 minutes
- Cook Time: 20 minutes
- Total Time: 30 minutes
- Yield: 6 servings
- Category: Dessert
- Cuisine: Japanese
Ingredients
- All-purpose flour – 1 cup (120 g)
- Baking powder – 1 tsp (4 g)
- Granulated sugar – 2 tbsp (25 g)
- Salt – a pinch
- Egg – 1 large, room temperature
- Milk – 3/4 cup (180 ml) (whole milk preferred, any dairy or non-dairy works)
- Vegetable oil – 1 tbsp (15 ml)
- Sweet red bean paste (anko) – 3/4 cup (200 g)
- Optional: Sweetened chestnut pieces – 1/4 cup
- Optional: Matcha powder – 1 tsp
Instructions
- Prepare the batter: In a large bowl, sift together 1 cup (120 g) all-purpose flour, 1 tsp (4 g) baking powder, 2 tbsp (25 g) granulated sugar, and a pinch of salt. Whisk to combine evenly.
- Mix wet ingredients: In a separate bowl, beat 1 large egg with 3/4 cup (180 ml) milk and 1 tbsp (15 ml) vegetable oil until smooth. If adding matcha, sift it into the dry ingredients before mixing.
- Combine wet and dry: Slowly pour wet ingredients into the dry mix, whisking gently to avoid lumps. The batter should be smooth and slightly thick, like pancake batter. Rest for 5 minutes to let the baking powder activate.
- Heat your taiyaki pan: Place over medium heat and brush both sides lightly with oil to prevent sticking and achieve a golden crisp.
- Fill the molds: Pour about 2 tbsp (30 ml) of batter into one side of the fish mold, spreading evenly but not overfilling. Add about 1 tbsp (15 g) of sweet red bean paste in the center, then cover with another 2 tbsp (30 ml) of batter to seal the filling inside.
- Close the mold and cook: Press the pan closed and cook for about 3-4 minutes on one side. Flip carefully and cook for another 3-4 minutes until golden brown and crispy with warm filling.
- Remove and cool: Use a fork or chopsticks to gently pry the fish cakes out. Place on a wire rack for a minute to cool slightly to avoid sogginess.
- Repeat: Continue with remaining batter and filling, oiling the pan as needed. Enjoy warm for best texture and flavor.
Notes
Use medium heat to avoid burnt edges and undercooked centers. Oil the pan between batches to keep cakes crisp. Cool on a wire rack to prevent sogginess. For gluten-free, substitute with almond or gluten-free flour blends. Variations include custard, chocolate, or savory fillings. Reheat in toaster oven or skillet, avoid microwave to maintain crispness.
Nutrition
- Serving Size: 1 fish-shaped cake
- Calories: 165
- Sugar: 8
- Sodium: 150
- Fat: 5
- Saturated Fat: 1
- Carbohydrates: 27
- Fiber: 3
- Protein: 4
Keywords: taiyaki, Japanese dessert, fish-shaped cake, red bean paste, sweet snack, homemade taiyaki, crispy cake