Introduction
Let me tell you, the crisp crackle of a golden-brown okonomiyaki hitting a hot skillet, combined with the mouthwatering aroma of cabbage and savory sauce, is enough to make anyone’s stomach rumble. The first time I made these crispy okonomiyaki Japanese savory pancakes, I was instantly hooked. It was one of those rare kitchen moments where you pause, take a deep breath, and just smile because you know you’re onto something truly special.
Years ago, when I was knee-high to a grasshopper, my grandma used to tell stories about the bustling street vendors in Osaka, flipping these hearty pancakes with practiced ease. I never thought I’d get to recreate that magic in my own kitchen until a rainy weekend nudged me to try. Honestly, I wish I’d discovered this recipe years ago — it’s dangerously easy and packs pure, nostalgic comfort in every bite.
My family couldn’t stop sneaking the okonomiyaki off the cooling rack (and I can’t really blame them!). Whether it’s a casual weeknight dinner or a sweet treat to brighten up your Pinterest cookie board, these Japanese savory pancakes have become a staple for our gatherings and gifting. Trust me, this crispy okonomiyaki recipe is one you’re going to want to bookmark and make again and again.
Why You’ll Love This Recipe
Having tested this crispy okonomiyaki Japanese savory pancake recipe more times than I can count (in the name of research, of course), I’m confident it delivers on flavor, texture, and simplicity. Here’s why you’re going to fall head over heels:
- Quick & Easy: Comes together in under 30 minutes, perfect for busy weeknights or last-minute cravings.
- Simple Ingredients: No fancy grocery trips needed; you likely already have everything in your kitchen.
- Perfect for Any Occasion: Great for brunch, potlucks, cozy dinners, or those lazy weekends when you want something special without fuss.
- Crowd-Pleaser: Always gets rave reviews from kids and adults alike, thanks to its crispy edges and savory, satisfying filling.
- Unbelievably Delicious: The texture combo—crispy outside, tender inside—is next-level comfort food.
What sets this recipe apart? It’s all about the technique: using just the right batter consistency and the magic of shredded cabbage to create that iconic crispy crust. Plus, the balanced blend of savory umami flavors in the sauce and toppings makes it feel like a warm hug on a plate. This isn’t just another pancake; it’s your best homemade okonomiyaki, with a crispy finish that you’ll crave every time.
What Ingredients You Will Need
This recipe uses simple, wholesome ingredients to deliver bold flavor and satisfying texture without the fuss. Most are pantry staples or easy to find at your local grocery or Asian market.
- For the Batter:
- 1 cup (120g) all-purpose flour
- 2/3 cup (160ml) dashi stock or water (dashi adds authentic umami, but water works too)
- 2 large eggs, room temperature
- 1/4 tsp salt
- 1/4 tsp baking powder (helps with fluffiness)
- For the Filling:
- 3 cups (about 300g) finely shredded cabbage (firm, crisp cabbage works best)
- 4 green onions, thinly sliced
- 4 oz (115g) thinly sliced pork belly or bacon (optional but highly recommended for authenticity)
- 1/4 cup tenkasu (tempura scraps) or crushed crispy rice crackers (adds crunch)
- Pickled ginger (beni shoga), finely chopped, about 2 tbsp (optional)
- For Topping & Sauce:
- Okonomiyaki sauce (store-bought or homemade, see notes below)
- Japanese mayonnaise (like Kewpie, for a creamy, tangy finish)
- Aonori (dried green seaweed flakes)
- Katsuobushi (bonito flakes), optional but adds smoky depth
Pro tip: I recommend using fresh cabbage and slicing it finely for the best texture, and if you can get Kewpie mayo and okonomiyaki sauce from an Asian market, that’s the golden ticket. Otherwise, you can whip up a quick sauce by mixing Worcestershire sauce, ketchup, and a little soy sauce.
For a gluten-free version, swap the all-purpose flour with a gluten-free blend or rice flour, and check your sauces for gluten content. Vegan? Use plant-based mayo and skip the pork or substitute with mushrooms.
Equipment Needed
- Large mixing bowl for combining batter and ingredients
- Sharp knife and cutting board for shredding cabbage and slicing pork
- Non-stick skillet or cast-iron pan (a flat griddle works great too)
- Spatula for flipping pancakes (a wide, sturdy one is best)
- Measuring cups and spoons for accuracy
- Optional: grater or mandoline to shred cabbage quickly
If you don’t have a non-stick skillet, a well-seasoned cast-iron pan will do wonders for getting that perfect crispy crust without sticking. I’ve tried both, and honestly, the cast iron gives a deeper sear, but non-stick is easier for beginners. A budget-friendly option is a large electric griddle — it’s perfect if you want to make several pancakes at once!
Preparation Method
- Prepare the cabbage and green onions: Finely shred about 3 cups (300g) of cabbage and thinly slice 4 green onions. Set aside. This step sets the foundation for that signature okonomiyaki texture. (5 minutes)
- Make the batter: In a large bowl, whisk 1 cup (120g) all-purpose flour, 1/4 tsp salt, and 1/4 tsp baking powder together. Add 2/3 cup (160ml) dashi stock or water and 2 large eggs (room temp). Stir until just combined — a slightly lumpy batter is fine. Avoid overmixing to keep pancakes tender. (5 minutes)
- Combine batter with filling: Add shredded cabbage, green onions, 1/4 cup tenkasu (tempura scraps), and 2 tbsp chopped pickled ginger (if using) to the batter. Mix gently but thoroughly. If you’re using pork belly slices, have them ready to place on top when cooking. (3 minutes)
- Heat the pan: Warm a non-stick skillet or cast iron over medium heat. Lightly oil the surface with a neutral oil (like vegetable or canola) to prevent sticking and encourage crisping. (2 minutes)
- Cook the pancakes: Scoop about 1 cup (240ml) of the batter mixture onto the pan, spreading it gently into a circle about 6 inches (15cm) wide and 1/2 inch (1.3cm) thick. Arrange 2-3 slices of pork belly on top if using. Cook for 4-5 minutes until the bottom is golden and crispy. (5 minutes)
- Flip carefully: Using a wide spatula, flip the okonomiyaki over. The pork belly should now be on the bottom, cooking into the pancake base. Press down gently with the spatula and cook for another 4-5 minutes until the other side is golden and pork is cooked through. (5 minutes)
- Check doneness: The pancake should be crispy on both sides and cooked through but still moist inside. If it needs more time, reduce heat slightly and cook an extra minute or two. (2 minutes)
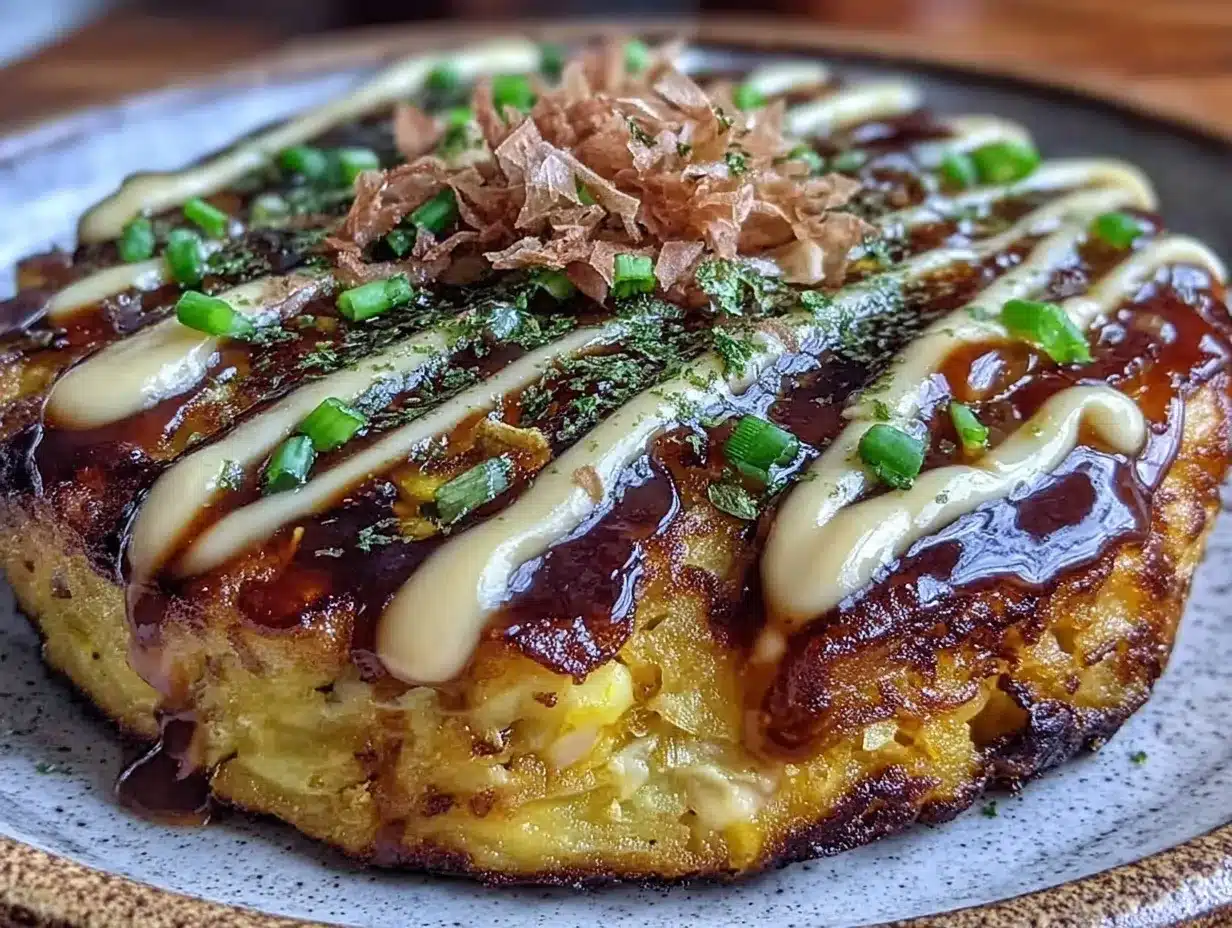
- Plate and add toppings: Transfer to a plate. Drizzle generously with okonomiyaki sauce and Japanese mayonnaise in a zigzag pattern. Sprinkle with aonori and katsuobushi flakes if you like. (2 minutes)
- Serve immediately: Okonomiyaki is best enjoyed hot and crispy right off the pan. (Immediate)
Quick tip: If flipping feels tricky, slide the pancake onto a plate first, then invert it back into the pan. Also, don’t crowd the pan — cooking one or two pancakes at a time gives the best results.
Cooking Tips & Techniques
Okonomiyaki might seem straightforward, but there are some tricks I learned the hard way that really make the difference.
- Don’t overmix the batter: A gently mixed batter keeps the pancakes tender. Overmixing can lead to a dense, chewy result.
- Shred cabbage finely: This helps the pancake hold together and creates that amazing contrast of crispy and soft textures.
- Heat management is key: Medium heat ensures a crispy exterior without burning. Too high, and you risk raw batter inside; too low, and the pancake won’t crisp.
- Use a wide spatula: It makes flipping easier and keeps the pancake intact. Pro tip: a fish spatula works wonders here.
- Patience pays off: Resist the urge to flip too soon. Let the bottom brown fully for that signature crispy crust.
- Multitasking tip: While the first pancake cooks, prep your toppings and sauce to save time.
Honestly, the first few flips can be a little nerve-wracking, but once you get the hang of it, making crispy okonomiyaki feels like a mini celebration each time.
Variations & Adaptations
One of the best things about okonomiyaki is how versatile it is. Here are a few ways to make it your own:
- Vegetarian version: Skip the pork belly and add sliced shiitake mushrooms or grated carrots for extra flavor and texture.
- Seafood okonomiyaki: Add chopped shrimp, squid, or scallops into the batter for a coastal twist.
- Gluten-free adaptation: Use rice flour or a gluten-free all-purpose blend, and swap okonomiyaki sauce with tamari-based alternatives.
- Spicy kick: Mix a little sriracha or chili oil into the batter or drizzle on top with mayo for those who like it hot.
- Personal favorite: I once added corn kernels and a little shredded cheese inside the batter — it was unexpectedly delicious and a hit with the kids!
Feel free to experiment with whatever you have on hand. Okonomiyaki literally means “grill what you like,” so it’s built for creativity.
Serving & Storage Suggestions
Serve your crispy okonomiyaki hot off the skillet for the best crunch and flavor. I love pairing it with a cold Japanese beer or a cup of green tea to balance the richness.
For a complete meal, serve alongside simple miso soup or a fresh cucumber salad for a touch of brightness.
Leftovers can be stored in an airtight container in the refrigerator for up to 2 days. To reheat, warm them gently in a non-stick skillet over medium-low heat to regain crispiness—microwaving tends to make them soggy, so avoid that if you can.
Okonomiyaki flavors actually deepen a bit after a day, so if you have leftovers, you might find them even tastier the next day!
Nutritional Information & Benefits
This crispy okonomiyaki recipe is a balanced dish that combines veggies, protein, and carbs in a single bite. A serving provides roughly 300-350 calories depending on pork use and toppings.
Cabbage is packed with vitamins C and K, fiber, and antioxidants, supporting digestion and immunity. Eggs add quality protein and essential nutrients, while dashi stock brings umami without extra calories.
If you opt for pork belly, it adds richness and protein but also more fat—feel free to swap for leaner meats or plant-based alternatives if preferred.
Many ingredients are naturally gluten-free except for the flour and sauces, but with simple substitutions, this recipe fits gluten-free and low-carb diets well.
From my wellness perspective, okonomiyaki is a comforting, nourishing meal that doesn’t feel like a compromise — it’s a satisfying way to get veggies and protein on your plate while indulging in something delicious.
Conclusion
There you have it: a crispy okonomiyaki recipe that’s easy to make at home, packed with flavor, and perfect for any occasion. Whether you customize it with your favorite fillings or keep it classic, these Japanese savory pancakes will quickly become a family favorite.
I love this recipe because it combines simplicity with that unbeatable crispy texture and rich, satisfying taste. It’s the kind of dish that brings people together around the table, sharing smiles and seconds.
Give it a try, tweak it your way, and don’t forget to leave a comment or share your own twists! Trust me, once you make these crispy okonomiyaki Japanese savory pancakes, you’ll want to make them again and again. Happy cooking!
FAQs
What is okonomiyaki?
Okonomiyaki is a Japanese savory pancake made with cabbage, batter, and various fillings like pork, seafood, or veggies. It’s often topped with special sauces, mayo, seaweed flakes, and bonito flakes.
Can I make okonomiyaki without pork?
Absolutely! You can easily make it vegetarian by skipping the pork and adding mushrooms, corn, or other veggies you like.
How do I get my okonomiyaki crispy?
Use medium heat and don’t rush the cooking. Make sure to shred the cabbage finely and use a non-stick or cast-iron pan with a little oil to achieve that golden, crispy crust.
Is okonomiyaki gluten-free?
Traditional okonomiyaki uses wheat flour and sauces with gluten, but you can substitute gluten-free flour and tamari-based sauces to make it gluten-free.
Can I prepare okonomiyaki batter ahead of time?
Yes, you can mix the batter and cabbage a few hours ahead and keep it refrigerated. Just give it a gentle stir before cooking, but avoid mixing too vigorously to keep the texture light.
Pin This Recipe!
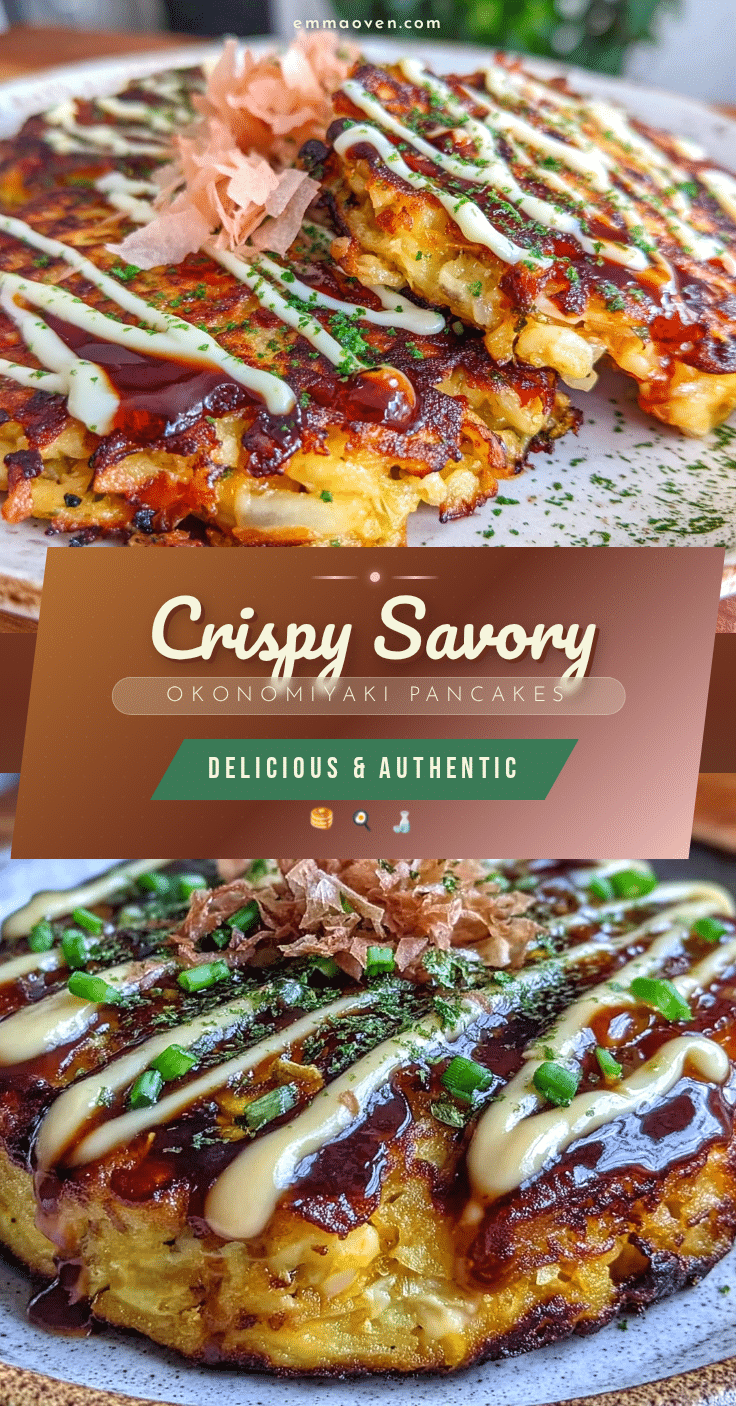
Crispy Okonomiyaki Recipe Easy Homemade Japanese Savory Pancakes

A crispy Japanese savory pancake featuring a golden-brown crust, shredded cabbage, and savory toppings, perfect for quick and satisfying meals.
- Prep Time: 13 minutes
- Cook Time: 16 minutes
- Total Time: 29 minutes
- Yield: 2-3 pancakes (about 3 servings) 1x
- Category: Main Course
- Cuisine: Japanese
Ingredients
- 1 cup (120g) all-purpose flour
- 2/3 cup (160ml) dashi stock or water
- 2 large eggs, room temperature
- 1/4 tsp salt
- 1/4 tsp baking powder
- 3 cups (about 300g) finely shredded cabbage
- 4 green onions, thinly sliced
- 4 oz (115g) thinly sliced pork belly or bacon (optional)
- 1/4 cup tenkasu (tempura scraps) or crushed crispy rice crackers
- 2 tbsp pickled ginger (beni shoga), finely chopped (optional)
- Okonomiyaki sauce (store-bought or homemade)
- Japanese mayonnaise (like Kewpie)
- Aonori (dried green seaweed flakes)
- Katsuobushi (bonito flakes), optional
Instructions
- Finely shred about 3 cups (300g) of cabbage and thinly slice 4 green onions. Set aside.
- In a large bowl, whisk 1 cup (120g) all-purpose flour, 1/4 tsp salt, and 1/4 tsp baking powder together. Add 2/3 cup (160ml) dashi stock or water and 2 large eggs (room temperature). Stir until just combined; a slightly lumpy batter is fine.
- Add shredded cabbage, green onions, 1/4 cup tenkasu (tempura scraps), and 2 tbsp chopped pickled ginger (if using) to the batter. Mix gently but thoroughly. Have pork belly slices ready if using.
- Heat a non-stick skillet or cast iron pan over medium heat. Lightly oil the surface with a neutral oil like vegetable or canola oil.
- Scoop about 1 cup (240ml) of the batter mixture onto the pan, spreading it into a circle about 6 inches (15cm) wide and 1/2 inch (1.3cm) thick. Arrange 2-3 slices of pork belly on top if using. Cook for 4-5 minutes until the bottom is golden and crispy.
- Using a wide spatula, flip the okonomiyaki over so the pork belly is on the bottom. Press down gently and cook for another 4-5 minutes until the other side is golden and pork is cooked through.
- Check that the pancake is crispy on both sides and cooked through but still moist inside. If needed, reduce heat and cook an extra minute or two.
- Transfer to a plate. Drizzle generously with okonomiyaki sauce and Japanese mayonnaise in a zigzag pattern. Sprinkle with aonori and katsuobushi flakes if desired.
- Serve immediately while hot and crispy.
Notes
Use medium heat to ensure a crispy exterior without burning. Avoid overmixing the batter to keep pancakes tender. Finely shred cabbage for best texture. If flipping is tricky, slide pancake onto a plate then invert back into the pan. For gluten-free, substitute flour and sauces accordingly. Vegan options include plant-based mayo and mushroom substitution for pork.
Nutrition
- Serving Size: One pancake (about 1
- Calories: 300350
- Sugar: 4
- Sodium: 600
- Fat: 18
- Saturated Fat: 5
- Carbohydrates: 28
- Fiber: 3
- Protein: 12
Keywords: okonomiyaki, Japanese savory pancake, crispy pancake, cabbage pancake, easy Japanese recipe, homemade okonomiyaki